A quick word from me
This issue isn't sponsored - I write these deep dives in my free time and keep them free for everyone. If your company sells AI tools, dev tools, courses, or services that .NET developers would actually use, sponsoring an issue is the most direct way to reach them.
Want to reach thousands of .NET developers? Sponsor TheCodeMan →Uno Platform lets you write C# + XAML once and run it everywhere: WebAssembly (in the browser), Windows (WinUI/WPF host), macOS, Linux (Skia/GTK), Android, and iOS.
If you’re a .NET dev, you already have the skills: XAML for UI, C# for logic, MVVM for structure.
In this guide, we’ll go from zero to a working Weather App that fetches data from an API, shows current conditions, and is structured for growth.
You’ll learn:
- How to scaffold an Uno Platform solution
- How to create a cross-platform application
- Project structure & where to put shared code
- DI + HttpClient with a typed service
- Building a responsive XAML UI that works on all targets
- WebAssembly caveats (CORS, base addresses) and how to handle them
- ✅ Result: one solution, one shared UI and logic, multiple platforms. ## Installing Uno Platform
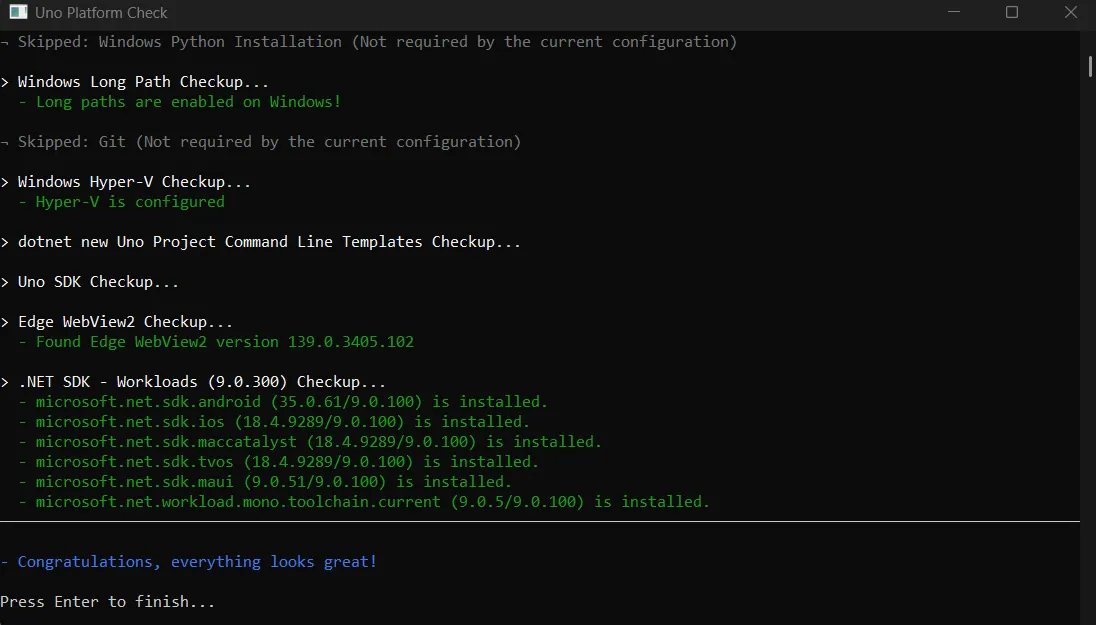
First, set up your toolchain with uno-check. Open Windows Terminal/PowerShell and install the tool, then run it:
dotnet tool install -g uno.check
Think of uno-check as a doctor for your .NET + Android + iOS + WebAssembly stack. It verifies your .NET SDK and workloads, required Visual Studio components, Android bits (JDK/NDK/platform-tools/emulators), WASM tooling, and common env issues - catching mismatches before you hit mysterious build errors.
Run it on first install, whenever you upgrade .NET/Visual Studio, or when switching machines.
uno.check
This safely installs/repairs workloads and patches paths; it’s idempotent, so rerunning is fine.
Team tip: add a global.json to pin your .NET SDK, then have everyone run uno.check --fix once.
If everything is set, you’ll get the friendly: “Congratulations, everything looks great!”
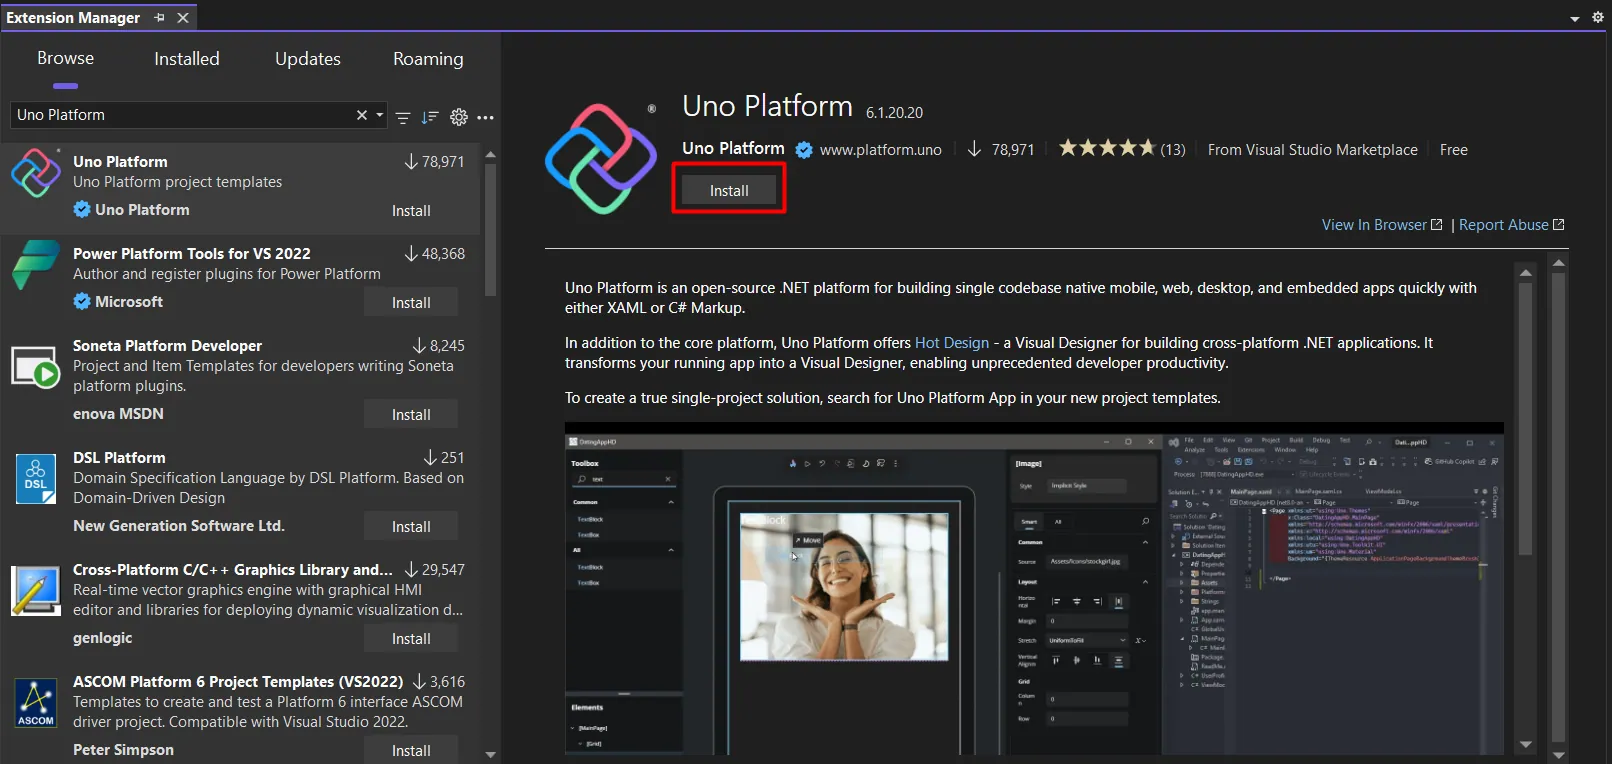
Visual Studio extension
The next thing you need is to set up your environment to create Uno Platform applications using C# and .NET with Visual Studio 2022.
For that, you should install the Uno Platform from the Manage Extension menu bar.
Here is the complete guide on how to do it.
Creating Uno App - Through Wizard
Now everything is ready to create our first application.
We will choose the Uno Platform App as the project type and name the application "TheWeather".
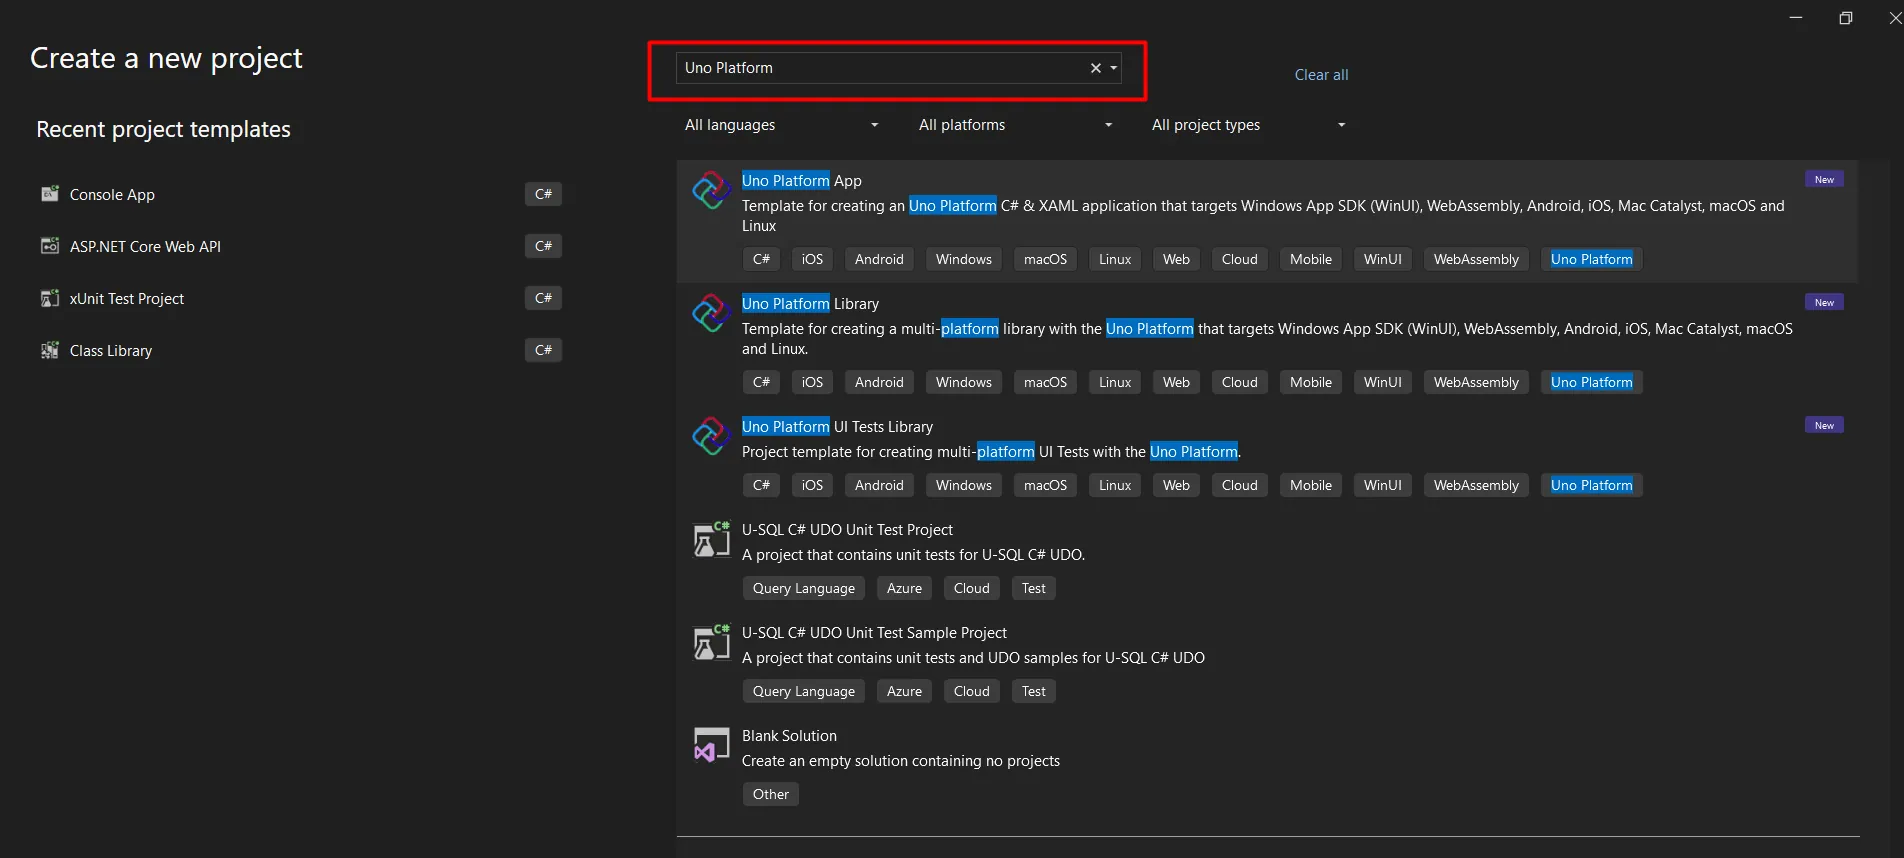
Creating a project opens the Wizard for configuring the Uno Platform application.
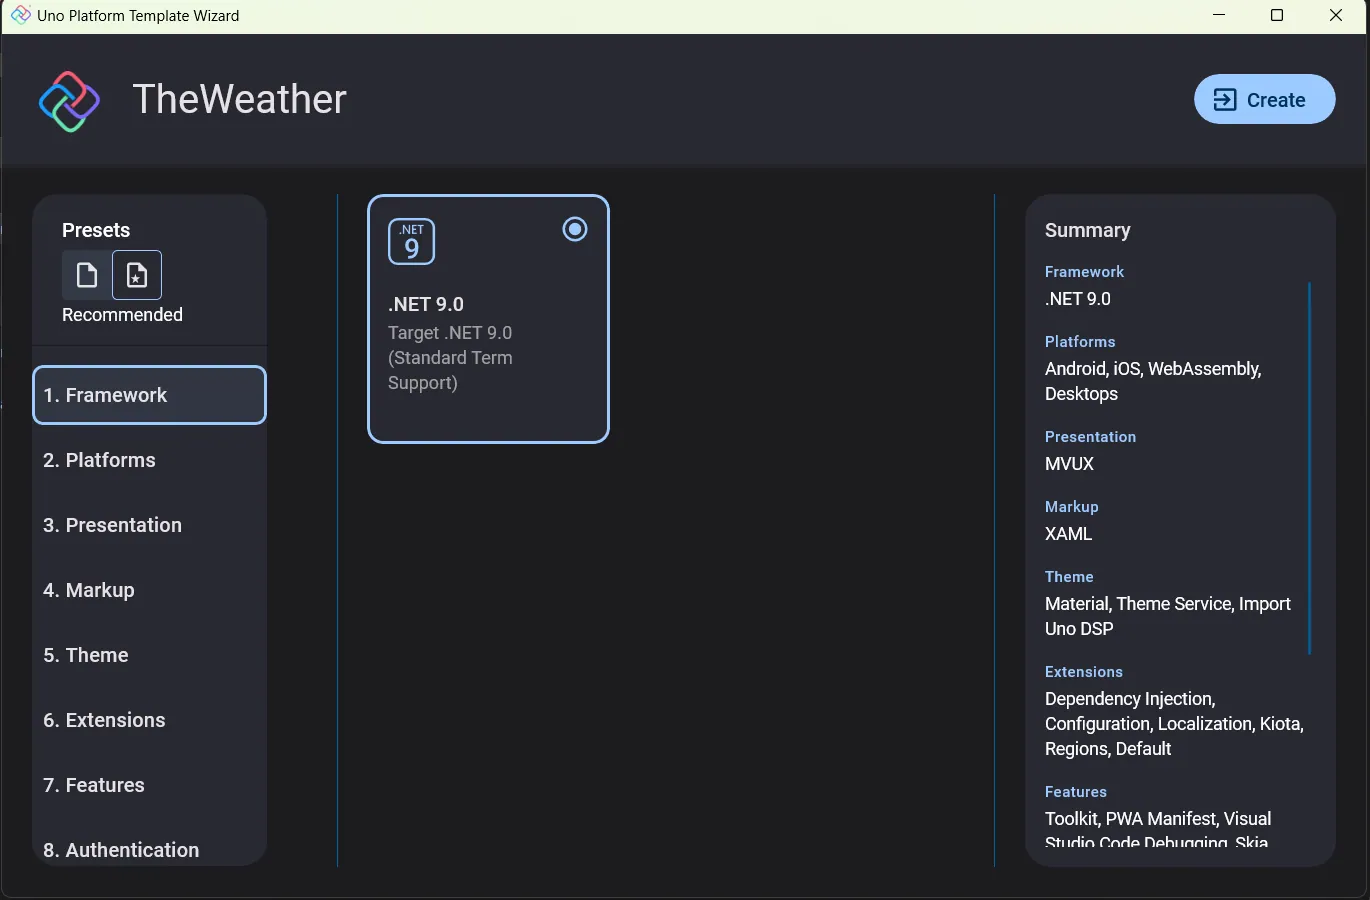
I will not show each section through images, but I will explain them.
1. Framework: Pick .NET 9 unless you have a hard constraint - fast, current, and best-supported. 2. Platforms: Start with Android + iOS + WebAssembly; add desktop (Skia) later with no shared-code changes. 3. Presentation: Choose MVVM for a first app; pick MVUX only if you already prefer reducer/state patterns. 4. Markup: XAML = best tooling/Hot Reload; C# Markup only if you want code-first UI. 5. Theme: Material + Theme Service for consistent cross-platform theming; Fluent for Windows look; Uno DSP adds design tokens. 6. Extensions: Enable DI, Configuration, Localization; HTTP (Basic) is enough; Regions keeps navigation testable. 7. Features: Add Uno.Toolkit, PWA Manifest, and VS Code Debugging; keep Skia renderer default. 8. Authentication: Use None for demos; add OIDC/MSAL later via the same DI. 9. Application: Set a reverse-DNS App ID (e.g., com.example.TheWeather) and author- used in manifests/bundles. 10. Testing: You can skip now; add unit tests for VMs first, UI tests once you have navigation/async flows.
Check all the details here.
Development
And your application is finally ready. If you run the application now, you will see the finished application with a text field and a button to switch to another page. It looks like this:
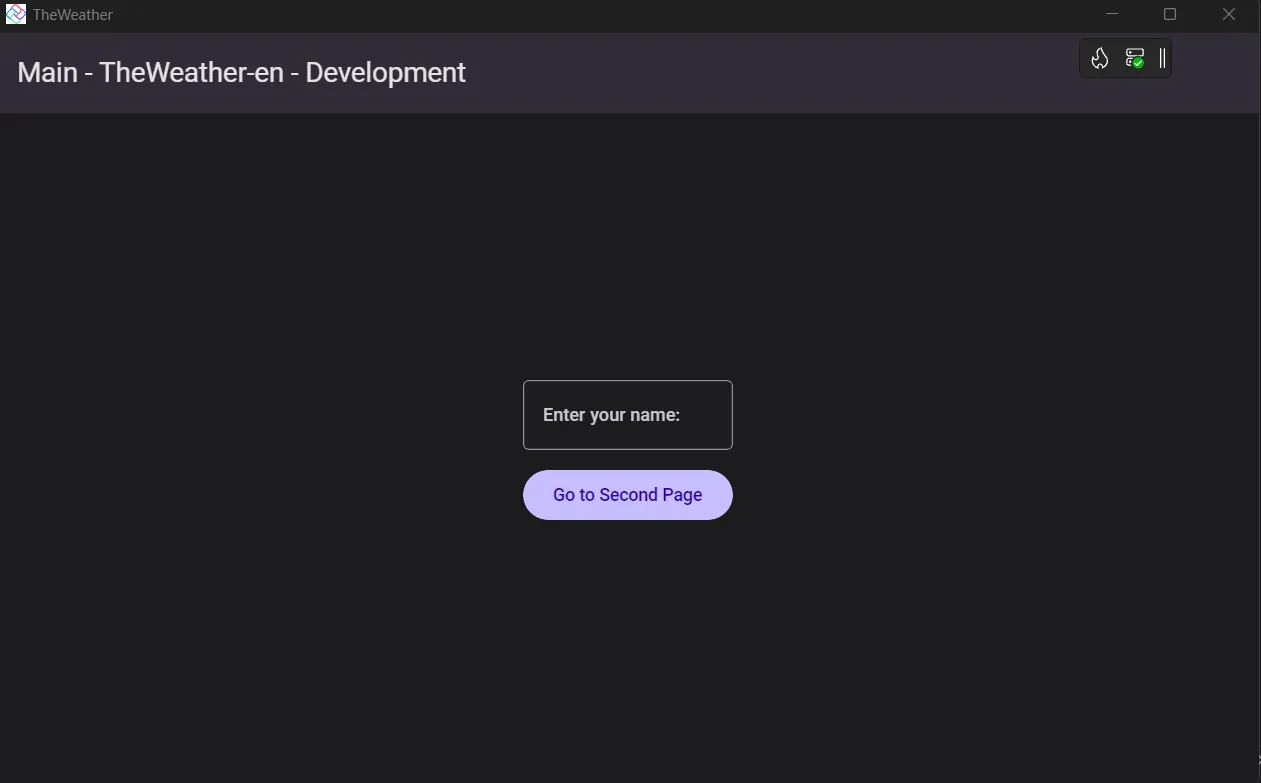
This is the layout of the desktop application. In addition, you can run the application on different platforms - I remind you that this is a cross-platform application.
For example, you can use an Android emulator to display the application on an Android phone:
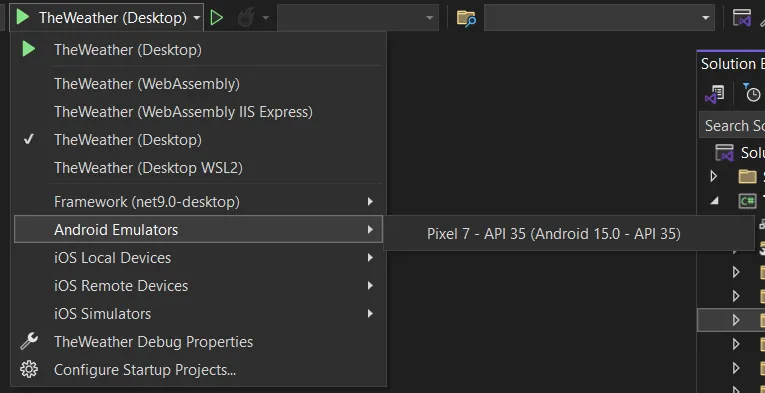
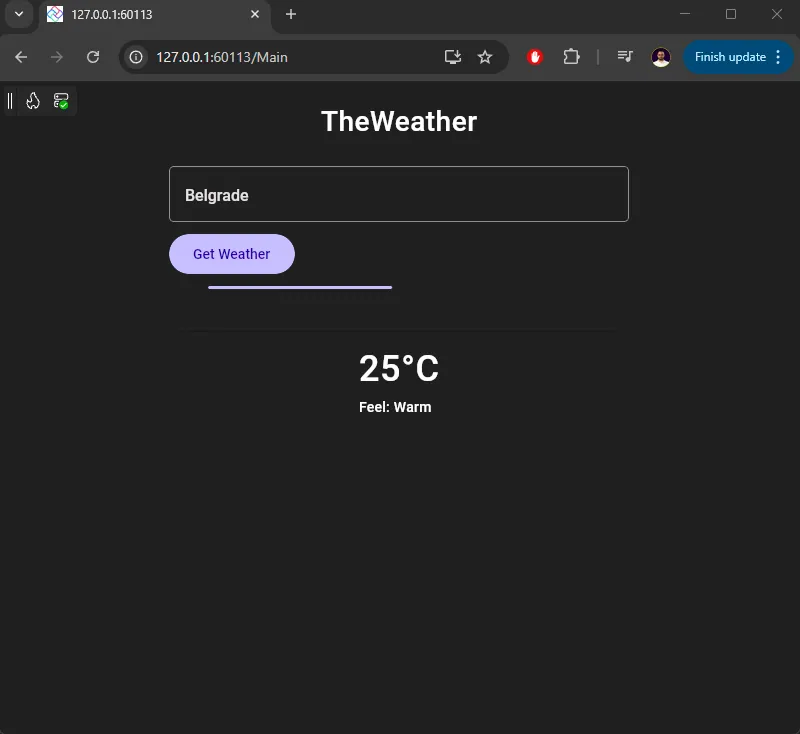
In case you don't see the emulator, you can add it from the wizard located in Tools -> Android -> Android Device Manager. Instead of this application, we will create a simple application for displaying the time for the passed city. It looks like this:
External API:
For testing purposes, I created a demo API that returns data for the passed city. Here's the endpoint I'm using there (I won't show the full API code).
app.MapGet("/weather", (string city) =>{ var forecast = Enumerable.Range(1, 5).Select(index => new WeatherForecast( DateOnly.FromDateTime(DateTime.Now.AddDays(index)), Random.Shared.Next(-20, 55), summaries[Random.Shared.Next(summaries.Length)] )).ToArray(); // deterministic pick for a couple of city names var selected = city switch { string s when s.Equals("Belgrade", StringComparison.OrdinalIgnoreCase) => forecast[0], string s when s.Equals("Paris", StringComparison.OrdinalIgnoreCase) => forecast[1], _ => forecast[2] }; var humidity = Random.Shared.Next(30, 90); var icon = iconBySummary.TryGetValue(selected.Summary ?? "", out var ic) ? ic : "01d"; var response = new WeatherResponse( Name: city, Main: new MainInfo(Temp: selected.TemperatureC, Humidity: humidity), Weather: new List<WeatherInfo> { new WeatherInfo( Description: (selected.Summary ?? "unknown").ToLowerInvariant(), Icon: icon) } );});
Build the XAML UI (MainPage.xaml)
Path: TheWeather/Presentation/MainPage.xaml
MainPage.xaml defines the UI for the app’s main screen in WinUI/Uno Platform. It lays out the title, a text box to enter a city, a button wired to the ViewModel’s LoadCommand, a progress bar for IsBusy, and fields bound to show the weather (icon, temperature, details). In short, it’s the view that binds to the MainModel and displays whatever the ViewModel provides.
<Page x:Class="TheWeather.Presentation.MainPage" xmlns="http://schemas.microsoft.com/winfx/2006/xaml/presentation" xmlns:x="http://schemas.microsoft.com/winfx/2006/xaml" xmlns:d="http://schemas.microsoft.com/expression/blend/2008" xmlns:mc="http://schemas.openxmlformats.org/markup-compatibility/2006" mc:Ignorable="d"> <Grid Background="{ThemeResource ApplicationPageBackgroundThemeBrush}"> <Grid.RowDefinitions> <RowDefinition Height="Auto" /> <RowDefinition Height="*" /> </Grid.RowDefinitions> <TextBlock Text="TheWeather" FontSize="28" FontWeight="SemiBold" Margin="16,24,16,12" HorizontalAlignment="Center" /> <StackPanel Grid.Row="1" Spacing="12" Margin="16" HorizontalAlignment="Center" Width="460"> <TextBox PlaceholderText="City" Text="{Binding City, Mode=TwoWay, UpdateSourceTrigger=PropertyChanged}" /> <Button Content="Get Weather" Command="{Binding LoadCommand}" /> <ProgressBar IsIndeterminate="True" Visibility="{Binding IsBusy, Converter={StaticResource BoolToVisibilityConverter}}" /> <TextBlock Text="{Binding StatusMessage}" Opacity="0.75" Foreground="White" /> <Border Padding="16" CornerRadius="12" BorderBrush="#33000000" BorderThickness="1"> <StackPanel Spacing="8" HorizontalAlignment="Center"> <TextBlock Text="{Binding Temperature}" FontSize="36" FontWeight="SemiBold" Foreground="White" /> <TextBlock Text="Feel: Warm" Foreground="White" /> </StackPanel> </Border> </StackPanel> </Grid></Page>
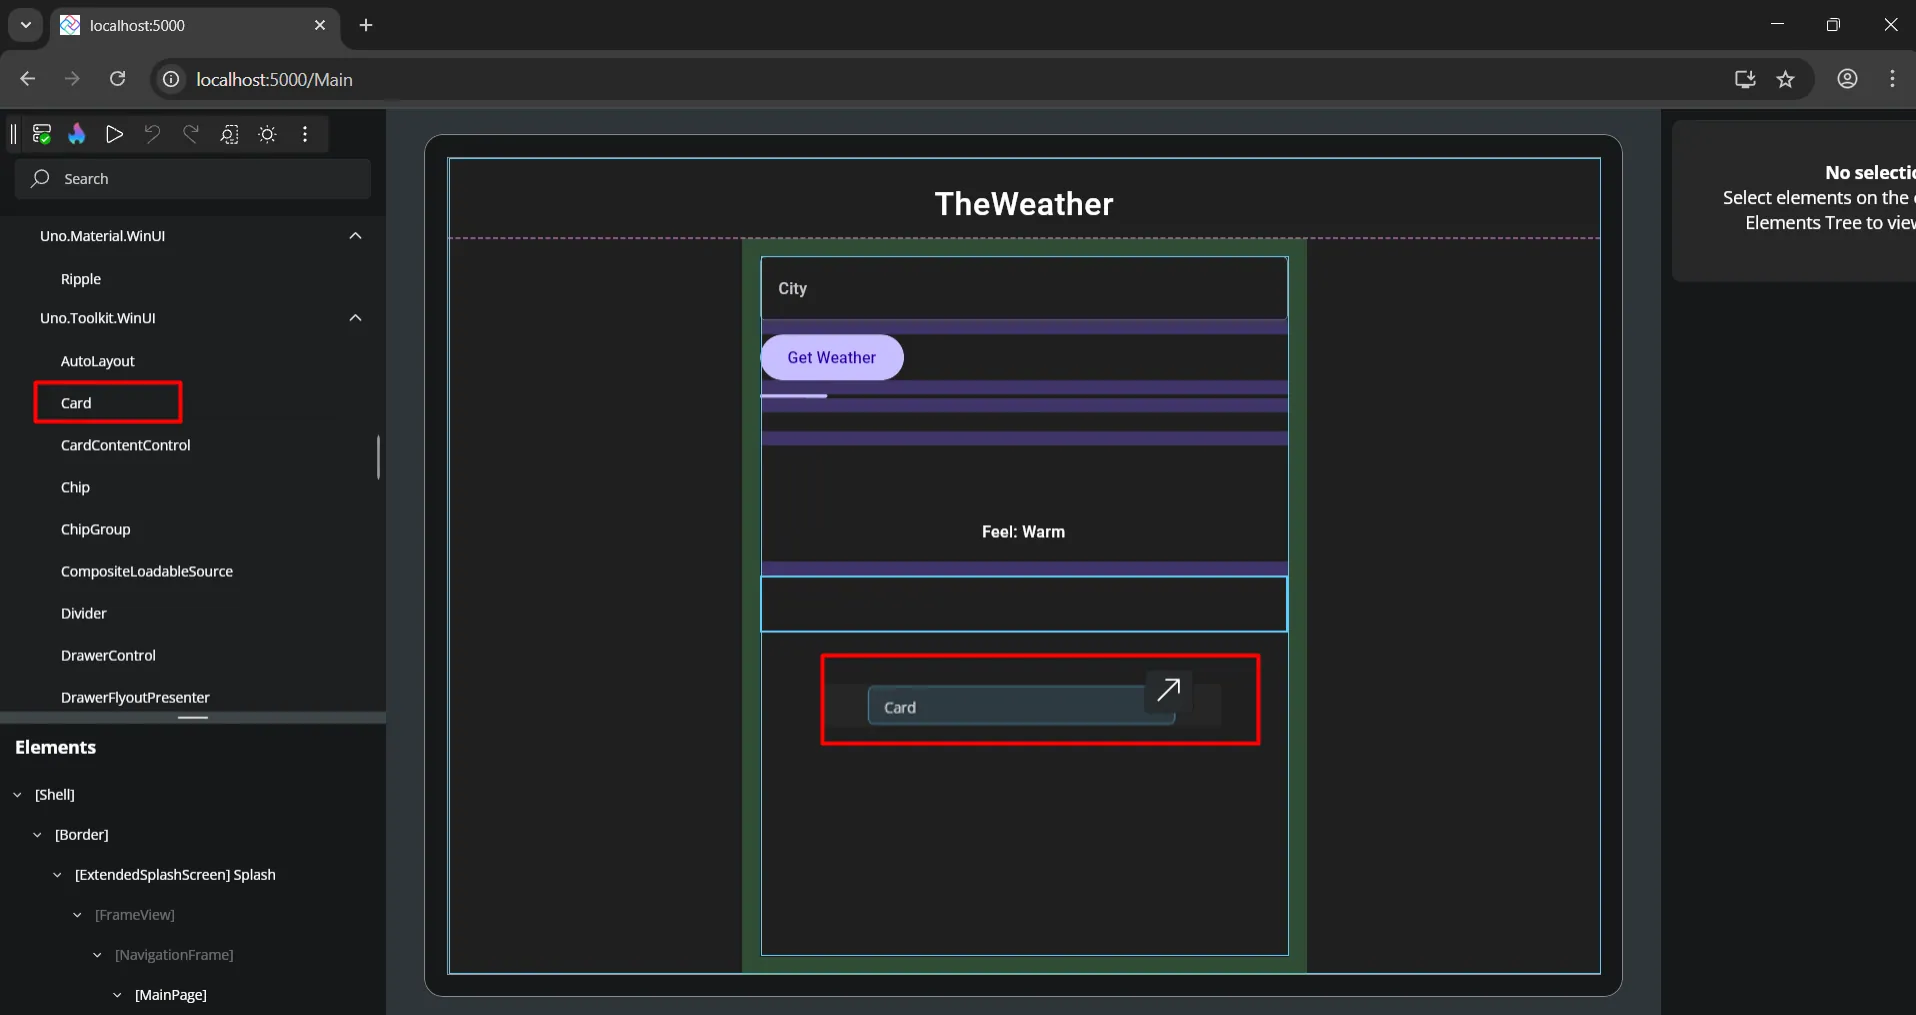
Let's make it easier - Hot Desing
Hot Design is Uno Platform’s superpower: you edit XAML while your real app is running (with real data), and the UI updates instantly - no rebuilds, no redeploys. It’s true WYSIWYG, bidirectional (visual edits change your XAML, XAML edits render live), and you can flip devices and themes on the fly. It works from Visual Studio, VS Code, or Rider - no new workflow to learn.
Hot Design lets you shape your UI while the app is running. You tweak XAML - spacing, grid definitions, styles, resources - and the change shows up instantly in your live app.
No rebuild, no redeploy, no “one more compile.” For layout work, that alone feels like cheating (in a good way).
You’re designing against reality: your real navigation frame, your real fonts, your real data.
That means you catch the stuff that usually slips through - long city names, empty/error states, odd locales - as you design. Flip between phone, tablet, and desktop presets to see how the same page breathes at different widths, and toggle light/dark/system to verify contrast and elevation in seconds.
Edits are bidirectional. Drag or nudge things in the visual surface, and your .xaml file updates; type in XAML and the UI refreshes live.
There’s nothing proprietary in the middle - clean diffs, normal PRs. And you don’t have to change your toolchain: it runs from Visual Studio, VS Code, or Rider.
Because the app stays alive, you can exercise real MVVM/MVUX state. Click your actual “Get Weather” button, land in a loading state, then keep adjusting the card while the spinner and text are on-screen. Custom and third-party controls render exactly as they will at runtime, so template quirks show up early, not on QA day.
Fair expectations: structural changes (adding projects, new DI registrations, renaming types) still need a build.
But for 80–90% of day-to-day UI work, Hot Design turns the loop into change → see → iterate, which boosts speed and raises the quality bar at the same time.
Add DTOs for Accepting Weather data
Path: TheWeather/Models/WeatherModels.cs
MainPage.xaml defines the UI for the app’s main screen in WinUI/Uno Platform. It lays out the title, a text box to enter a city, a button wired to the ViewModel’s LoadCommand, a progress bar for IsBusy, and fields bound to show the weather (icon, temperature, details). In short, it’s the view that binds to the MainModel and displays whatever the ViewModel provides.
public sealed class WeatherResponse{ [JsonPropertyName("name")] public string? City { get; set; } [JsonPropertyName("main")] public MainInfo? Main { get; set; } [JsonPropertyName("weather")] public List<WeatherInfo>? Weather { get; set; }} public sealed class MainInfo{ [JsonPropertyName("temp")] public double Temp { get; set; }} public sealed class WeatherInfo{ [JsonPropertyName("description")] public string? Description { get; set; } [JsonPropertyName("icon")] public string? Icon { get; set; }}
Build a Weather Service
Path: TheWeather/Services/API/WeatherService.cs
We use this service to connect to an external API and provide weather data for a specific city.
public sealed class WeatherService(HttpClient http) : IWeatherService{ private static readonly JsonSerializerOptions JsonOpts = new(JsonSerializerDefaults.Web); public async Task<WeatherResponse?> GetByCityAsync(string city, CancellationToken ct = default) { // Expecting a proxy endpoint /weather?city=... var response = await http.GetAsync($"/weather?city={Uri.EscapeDataString(city)}", ct); if (!response.IsSuccessStatusCode) return null; await using var s = await response.Content.ReadAsStreamAsync(ct); return await JsonSerializer.DeserializeAsync<WeatherResponse>(s, JsonOpts, ct); }}
Update ViewModel (MainModel.cs)
Path: TheWeather/Presentation/MainModel.cs
MainModel is the ViewModel for MainPage: it exposes bindable properties (City, IsBusy, StatusMessage, Temperature, Details, IconUrl) using CommunityToolkit.MVVM, and an IAsyncRelayCommand (LoadCommand) that calls IWeatherService to fetch weather by city.
It handles the async flow (sets IsBusy, catches errors), maps the API response into UI-friendly strings (e.g., "23.4°C", "overcast"), and builds the icon URL, raising property change notifications so the page updates automatically.
public partial class MainModel : ObservableObject{ private readonly IWeatherService _service; [ObservableProperty] private string _city = "Paris"; [ObservableProperty] private bool _isBusy; [ObservableProperty] private string? _statusMessage = "Ready"; [ObservableProperty] private string? _temperature; [ObservableProperty] private string? _details; [ObservableProperty] private string? _iconUrl; public IAsyncRelayCommand LoadCommand { get; } public MainModel(IWeatherService service) { _service = service; LoadCommand = new AsyncRelayCommand(LoadAsync); } private async Task LoadAsync() { try { IsBusy = true; StatusMessage = $"Loading weather for {City}..."; var data = await _service.GetByCityAsync(City); if (data is null) { StatusMessage = "No data found."; Temperature = Details = IconUrl = null; return; } var tempC = data.Main?.Temp ?? 0; var desc = data.Weather?.FirstOrDefault()?.Description ?? "n/a"; var hum = data.Main?.Humidity ?? 0; var icon = data.Weather?.FirstOrDefault()?.Icon; Temperature = $"{tempC:0.#}°C"; Details = $"{desc} · Humidity {hum}%"; IconUrl = string.IsNullOrWhiteSpace(icon) ? null : $"https://openweathermap.org/img/wn/{icon}@2x.png"; StatusMessage = $"Weather for {data.City ?? City}"; } catch (Exception ex) { StatusMessage = $"Error: {ex.Message}"; } finally { IsBusy = false; } }}
And the last piece here would be registering necessary services in App.xaml.cs file, which is like Program.cs file in your API projects.
.ConfigureServices((context, services) => { var baseUri = new Uri("https://localhost:7121"); services.AddHttpClient<IWeatherService, WeatherService>(c => c.BaseAddress = baseUri); services.AddTransient<MainModel>(); }) .UseNavigation(ReactiveViewModelMappings.ViewModelMappings, RegisterRoutes)
And that's it - you have a cross-platform application you can run on various devices!
So, Why Uno Platform?
If you already speak C# and XAML, Uno Platform is the most friction-free way to take that muscle memory everywhere - Windows, iOS, Android, macOS, Linux (via Skia), and even the browser through WebAssembly.
You write WinUI-style XAML once, bind it to your .NET code, and Uno Platform renders it with native controls where it makes sense or with Skia for pixel-perfect fidelity. That means the same layout, the same bindings, the same control templates, you know - no context-switching to a different UI stack per platform.
Uno Platform shines when you need to reach without rebuilding screens multiple times. Because it’s “WinUI-first,” your XAML knowledge transfers immediately: Grid, StackPanel, DependencyProperties, DataTemplates, and the whole binding story all behave as you expect.
On non-Windows targets, Uno Platform maps those concepts to each platform, so your mental model stays intact while your app runs natively. Add the WebAssembly target and you also get frictionless distribution: share a link and your app runs in the browser with no plugins.
From a product-engineering standpoint, Uno Platform’s value is in consistency and reuse. You keep a shared UI layer plus platform heads for the few places you need native APIs or platform-specific polish. You can drop into #if guards or partial classes when you must, but the bulk of the code - including your view models, navigation, HTTP calls, and styling - remains shared.
The ecosystem around Uno Platform (Uno.Extensions, Material/Fluent themes, Toolkit navigation) gives you DI, configuration, localization, and navigation patterns out of the box, so you start building features on day one instead of wiring plumbing.
Tooling is another practical win. You stay in Visual Studio, use Hot Reload/Hot Design to iterate quickly, and keep your standard .NET debugging, profiling, and unit-testing flow. For WebAssembly, you can enable AOT when publishing for faster startup and better runtime performance, and on desktop/mobile, you’re just running .NET - no JavaScript bridges required.
Wrapping Up
Uno Platform makes cross-platform practical for .NET developers: one codebase, native-feeling UI, and a familiar MVVM workflow.
Finally, Uno Platform is open source and community-driven, with commercial backing and steady updates aligned to modern .NET.
If your team prefers WinUI/XAML and wants one codebase that truly covers browser + mobile + desktop, Uno Platform is a very strong fit.
If you’re heavily invested in native design systems per platform or want a Xamarin.Forms/Maui-style API, you might prefer those alternatives - but if your north star is “one codebase to rule them all” with first-class WebAssembly, Uno Platform is built exactly for that.
In this beginner tutorial, you shipped a working Weather App that runs on Web, Desktop, and Mobile.
From here, try:
- MVVM Navigation (add a Favorites page)
- Geolocation to auto-detect the city on mobile
- Local storage for recent searches
- Forecast view (list + chart)
- Polished theming and responsive layout
That's all from me for today.
Make a coffee and try the Uno Platform.