A quick word from me
This issue isn't sponsored - I write these deep dives in my free time and keep them free for everyone. If your company sells AI tools, dev tools, courses, or services that .NET developers would actually use, sponsoring an issue is the most direct way to reach them.
Want to reach thousands of .NET developers? Sponsor TheCodeMan →🚀 Coming Soon: Enforcing Code Style
A brand-new course is launching soon inside The CodeMan Community!
Join now to lock in early access when it drops - plus get everything else already inside the group.
Founding Member Offer:
- First 100 members get in for just $4/month - 80 spots already taken!
Or subscribe for 3 months ($12) or annually ($40) to unlock full access when the course goes live.
Get ahead of the game - and make clean, consistent code your superpower. Join here

Watch Bulk Operations with Dapper Plus on YouTube
Background
Every developer hits this moment: you need to import a big batch of data - maybe from a CSV file - into SQL Server.
At first, it seems simple enough: loop through the rows and insert them one by one using Dapper. Then, your app slows to a crawl.
That’s where Dapper Plus comes in.
In this post, I’ll show you how to create a fast, reliable CSV import using Dapper Plus.
We'll:
- Read data from a CSV file
- Map it to a C# entity
- Use Dapper Plus to bulk insert everything into SQL Server
- Handle validation and errors
- Support async operations and cancellation tokens
- Testing performance
Let’s jump in.
What is Dapper Plus?
Why use it instead of regular Dapper?
Dapper is awesome for performance and simple queries. But when you need to insert thousands (or millions) of records, it's not optimized for that.
Every insert is a round trip to the database.
Dapper Plus solves that with bulk operations like:
- BulkInsert
- BulkUpdate
- BulkMerge
- BulkDelete
It reduces database round-trips and can import 100,000+ rows in just a few seconds.
Our Goal: CSV → C# → SQL Server
Here’s the big picture:
- Parse a CSV file with product data
- Map each line to a Product class
- Use BulkInsert to push it into SQL Lite - fast
- Handle things like:
- Validation
- Async/cancel support
- Error handling
We’ll walk through the whole thing step by step.
Step 1: Define Your Entity
We’re importing products, so let’s start with a Product class:
public class Product{ public int ProductId { get; set; } public string Name { get; set; } public string Category { get; set; } public decimal Price { get; set; } public bool InStock { get; set; }}
This will match the CSV column headers and your database table schema.
Step 2: Install the NuGet Packages
We need two libraries:
- Z.Dapper.Plus – for the bulk insert magic
- CsvHelper – to easily read CSV files
Install-Package Z.Dapper.PlusInstall-Package CsvHelper
Note: Dapper Plus is commercial software - you’ll need a license for production use, but you can try it for free.
Step 3: Configure Dapper Plus Mapping
Dapper Plus needs to know how to map your class to the database table. You do this once at app startup:
DapperPlusManager.Entity<Product>() .Table("Products") // Table name in SQL Server .Map(p => p.ProductId) .Map(p => p.Name) .Map(p => p.Category) .Map(p => p.Price) .Map(p => p.InStock);
Now Dapper Plus knows: “Hey, when I see a Product, I’ll map it to the Products table and these columns.”
Step 4: Read the CSV File
Let’s load the CSV and convert it to a list of products.
using CsvHelper;using System.Globalization; public static List<Product> ParseCsv(string filePath){ using var reader = new StreamReader(filePath); using var csv = new CsvReader(reader, CultureInfo.InvariantCulture); return csv.GetRecords<Product>().ToList();}
Make sure your CSV headers match the property names (case-insensitive).
Step 5: Do the Bulk Insert (Synchronous)
Let’s bring it all together.
public void ImportProducts(string csvFilePath, IDbConnection dbConnection){ var products = ParseCsv(csvFilePath); try { dbConnection.BulkInsert(products); Console.WriteLine($"{products.Count} products imported successfully."); } catch (Exception ex) { Console.WriteLine("Something went wrong during bulk insert: " + ex.Message); // Optional: log or retry }}
This is already much faster than looping through inserts. But let’s improve it even more.
Bonus: Async Support + Cancellation Tokens
If you're using background jobs, APIs, or UI buttons - async support matters.
public async Task ImportProductsAsync( string csvFilePath, IDbConnection dbConnection, CancellationToken cancellationToken){ var products = ParseCsv(csvFilePath); try { cancellationToken.ThrowIfCancellationRequested(); await dbConnection.BulkInsertAsync(products, cancellationToken); Console.WriteLine($"{products.Count} products imported successfully (async)."); } catch (OperationCanceledException) { Console.WriteLine("Import was canceled."); } catch (Exception ex) { Console.WriteLine("Bulk insert failed: " + ex.Message); }}
If someone clicks “Cancel” in your UI, or your job times out - it’ll stop cleanly.
Step 6: Validate Your Data Before Import
Don’t blindly insert rows - check them first!
products = products .Where(p => !string.IsNullOrWhiteSpace(p.Name) && p.Price >= 0) .ToList();
For advanced scenarios, you could group errors and return them to the user:
var invalidProducts = products.Where(p => p.Price < 0).ToList();if (invalidProducts.Any()){ // show warning or log it}
Performance Test Results
In order to make testing as easy and simple as possible, I will not use csv, but will randomly generate data in a simple foreach loop. The point is to test only the entry into the database. Here is the ProductService, which is used to generate product i and which has 2 important methods for us: InsertWithDapperAsync and InsertWithDapperPlusAsync.
public class ProductService{ private readonly IDbConnection _connection; private readonly Random _random = new(); private static readonly string[] SampleNames = new[] { "Mouse", "Keyboard", "Monitor", "Speaker", "Tablet", "Webcam", "Laptop", "Headphones", "Microphone", "SSD" }; public ProductService(IDbConnection connection) { _connection = connection; } public List<Product> GenerateProducts(int count) { var list = new List<Product>(); for (int i = 0; i < count; i++) { list.Add(new Product { Name = SampleNames[_random.Next(SampleNames.Length)], Price = Math.Round((decimal)(_random.NextDouble() * 500), 2) }); } return list; } public async Task InsertWithDapperAsync(List<Product> products) { const string sql = "INSERT INTO Products (Name, Price) VALUES (@Name, @Price)"; foreach (var product in products) { await _connection.ExecuteAsync(sql, product); } } public async Task InsertWithDapperPlusAsync(List<Product> products) { await _connection.BulkInsertAsync(products); }}
We will use SQL Lite for the database. Here's what the setup looks like in Program.cs:
DapperPlusManager.Entity<Product>() .Table("Products") .Map(p => p.Name) .Map(p => p.Price); // Register servicesbuilder.Services.AddSingleton<IDbConnection>(_ =>{ var conn = new SqliteConnection("Data Source=products.db"); Batteries.Init(); conn.Open(); EnsureDatabaseSchema(conn); return conn;});
And we will use 2 endpoints for testing:
app.MapPost("/seed/dapper", async (int count, ProductService service) =>{ var products = service.GenerateProducts(count); var sw = System.Diagnostics.Stopwatch.StartNew(); await service.InsertWithDapperAsync(products); sw.Stop(); return Results.Ok($"Inserted {count} records with Dapper in {sw.ElapsedMilliseconds}ms");}); app.MapPost("/seed/dapperplus", async (int count, ProductService service) =>{ var products = service.GenerateProducts(count); var sw = System.Diagnostics.Stopwatch.StartNew(); await service.InsertWithDapperPlusAsync(products); sw.Stop(); return Results.Ok($"Inserted {count} records with Dapper Plus in {sw.ElapsedMilliseconds}ms");});
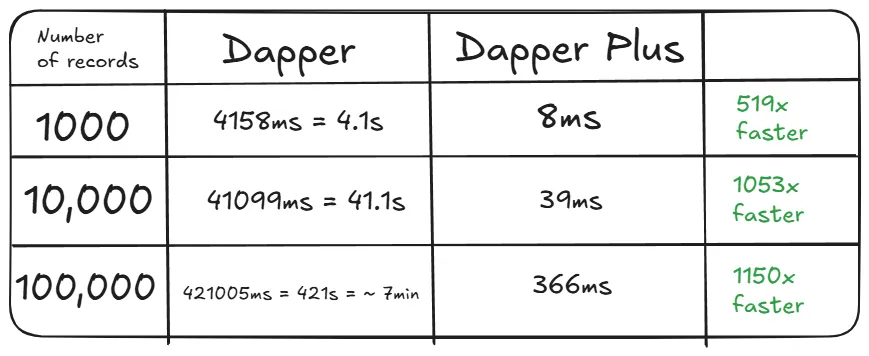
With the help of Postman, I tested 3 cases, for 1000, 10,000 and 100,000 records for inserting into the database. Here are the results:
Wrapping Up
Both Dapper and Dapper Plus are fantastic tools - they just serve different needs.
If you're doing simple inserts, updates, or queries and you're not hitting performance issues, Dapper is more than enough. It's lightweight, fast, and gives you full control.
But once you start working with large datasets - think bulk imports, sync jobs, or anything that involves thousands of rows - Dapper Plus really shines.
Its bulk operations can save you seconds or even minutes, and the API is clean and easy to plug into existing code.
Here you can take a look on some available online examples.
Here you can find repository with the source code.
That's all from me today.
P.S. Follow me on YouTube.